How to install Sublime Text 2 on Ubuntu 13.10

Most of the programmers out there have heared about Sublime Text 2.
This is a tutorial showing you how to install it on Ubuntu 13.10. Same steps will work on the previous versions of Ubuntu as well:

1. Download the Sublime Text2 file (.tar.bz2) from http://www.sublimetext.com/2

2. Extract the .tar.bz2 file:
tar xf Sublime\ Text\ 2.0.2\ x64.tar.bz2

3. You’ll get a “Sublime Text 2″ folder after extraction. This folder contains all the files that Sublime Text will need. So we have to move that folder somewhere more appropriate. Like the “/opt/” folder :
sudo mv Sublime\ Text\ 2 /opt/

 4. At some point you’d want to be able to call Sublime Text from the Terminal by just typing “sublime”. To do that, we’ll just create a symbolic link in “/usr/bin” like thus:
sudo ln -s /opt/Sublime\ Text\ 2/sublime_text /usr/bin/sublime

5. Now that our files are at the right place, we need to create a launcher in Unity. To do this, we’re going to create a .desktop file in “/usr/share/applications”:
sudo sublime /usr/share/applications/sublime.desktop

and paste this content:
[Desktop Entry]
Version=1.0
Name=Sublime Text 2
# Only KDE 4 seems to use GenericName, so we reuse the KDE strings.
# From Ubuntu's language-pack-kde-XX-base packages, version 9.04-20090413.
GenericName=Text Editor

Exec=sublime
Terminal=false
Icon=/opt/Sublime Text 2/Icon/48x48/sublime_text.png
Type=Application
Categories=TextEditor;IDE;Development
X-Ayatana-Desktop-Shortcuts=NewWindow

[NewWindow Shortcut Group]
Name=New Window
Exec=sublime -n
TargetEnvironment=Unity


6. Now you would probably want to open all text files with Sublime Text 2. The easiest way to do that is to open up the file associations list:
sudo sublime /usr/share/applications/defaults.list

And replace all occurrences of gedit.desktop with sublime.desktop.

That's it. I hope you enjoyed it and here is a screenshot with the Sublime Text 2 application running on Ubuntu:

How to install Photoshop CS5 and CS6 on Ubuntu

First of all you need Wine:
sudo apt-get install wine

After that all you need to do is download this file and run it under Wine. 
Download link for Adobe Photoshop CS5 ( Work on both windows and ubuntu under wine ) 
http://www.gulfup.com/?o2AUeI

Download link for Adobe Photoshop CS6 ( Work on both windows and ubuntu under wine )
http://www.gulfup.com/?21NeK1

How to use Photoshop 3D Engine on Ubuntu
Open Wine settings and change xp to windows 7
it will work only if you have Open GL driver installed on Ubuntu.


Here are some proof pictures of Photoshop CS5 running on Ubuntu 13.04:


Backtracking EMAIL Messages

Tracking email back to its source: Twisted Evil
cause i hate spammers... Evil or Very Mad

Ask most people how they determine who sent them an email message and the response is almost universally, "By the From line." Unfortunately this symptomatic of the current confusion among internet users as to where particular messages come from and who is spreading spam and viruses. The "From" header is little more than a courtesy to the person receiving the message. People spreading spam and viruses are rarely courteous. In short, if there is any question about where a particular email message came from the safe bet is to assume the "From" header is forged.

So how do you determine where a message actually came from? You have to understand how email messages are put together in order to backtrack an email message. SMTP is a text based protocol for transferring messages across the internet. A series of headers are placed in front of the data portion of the message. By examining the headers you can usually backtrack a message to the source network, sometimes the source host. A more detailed essay on reading email headers can be found .

If you are using Outlook or Outlook Express you can view the headers by right clicking on the message and selecting properties or options.

Below are listed the headers of an actual spam message I received. I've changed my email address and the name of my server for obvious reasons. I've also double spaced the headers to make them more readable.


Return-Path: <s359dyxtt@yahoo.com>

X-Original-To: davar@example.com

Delivered-To: davar@example.com

Received: from 12-218-172-108.client.mchsi.com (12-218-172-108.client.mchsi.com [12.218.172.108])
by mailhost.example.com (Postfix) with SMTP id 1F9B8511C7
for <davar@example.com>; Sun, 16 Nov 2003 09:50:37 -0800 (PST)

Received: from (HELO 0udjou) [193.12.169.0] by 12-218-172-108.client.mchsi.com with ESMTP id <536806-74276>; Sun, 16 Nov 2003 19:42:31 +0200

Message-ID: <n5-l067n7z$46-z$-n@eo2.32574>

From: "Maricela Paulson" <s359dyxtt@yahoo.com>

Reply-To: "Maricela Paulson" <s359dyxtt@yahoo.com>

To: davar@example.com

Subject: STOP-PAYING For Your PAY-PER-VIEW, Movie Channels, Mature Channels...isha

Date: Sun, 16 Nov 2003 19:42:31 +0200

X-Mailer: Internet Mail Service (5.5.2650.21)

X-Priority: 3

MIME-Version: 1.0

Content-Type: multipart/alternative; boundary="MIMEStream=_0+211404_90873633350646_4032088448"


According to the From header this message is from Maricela Paulson at s359dyxxt@yahoo.com. I could just fire off a message to abuse@yahoo.com, but that would be waste of time. This message didn't come from yahoo's email service.

The header most likely to be useful in determining the actual source of an email message is the Received header. According to the top-most Received header this message was received from the host 12-218-172-108.client.mchsi.com with the ip address of 21.218.172.108 by my server mailhost.example.com. An important item to consider is at what point in the chain does the email system become untrusted? I consider anything beyond my own email server to be an unreliable source of information. Because this header was generated by my email server it is reasonable for me to accept it at face value.

The next Received header (which is chronologically the first) shows the remote email server accepting the message from the host 0udjou with the ip 193.12.169.0. Those of you who know anything about IP will realize that that is not a valid host IP address. In addition, any hostname that ends in client.mchsi.com is unlikely to be an authorized email server. This has every sign of being a cracked client system.


Here's is where we start digging. By default Windows is somewhat lacking in network diagnostic tools; however, you can use the tools at to do your own checking.

davar@nqh9k:[/home/davar] $whois 12.218.172.108

AT&T WorldNet Services ATT (NET-12-0-0-0-1)
12.0.0.0 - 12.255.255.255
Mediacom Communications Corp MEDIACOMCC-12-218-168-0-FLANDREAU-MN (NET-12-218-168-0-1)
12.218.168.0 - 12.218.175.255

# ARIN WHOIS database, last updated 2003-12-31 19:15
# Enter ? for additional hints on searching ARIN's WHOIS database.

I can also verify the hostname of the remote server by using nslookup, although in this particular instance, my email server has already provided both the IP address and the hostname.

davar@nqh9k:[/home/davar] $nslookup 12.218.172.108

Server: localhost
Address: 127.0.0.1

Name: 12-218-172-108.client.mchsi.com
Address: 12.218.172.108

Ok, whois shows that Mediacom Communications owns that netblock and nslookup confirms the address to hostname mapping of the remote server,12-218-172-108.client.mchsi.com. If I preface a www in front of the domain name portion and plug that into my web browser, http://www.mchsi.com, I get Mediacom's web site.

There are few things more embarrassing to me than firing off an angry message to someone who is supposedly responsible for a problem, and being wrong. By double checking who owns the remote host's IP address using two different tools (whois and nslookup) I minimize the chance of making myself look like an idiot.

A quick glance at the web site and it appears they are an ISP. Now if I copy the entire message including the headers into a new email message and send it to abuse@mchsi.com with a short message explaining the situation, they may do something about it.

But what about Maricela Paulson? There really is no way to determine who sent a message, the best you can hope for is to find out what host sent it. Even in the case of a PGP signed messages there is no guarantee that one particular person actually pressed the send button. Obviously determining who the actual sender of an email message is much more involved than reading the From header. Hopefully this example may be of some use to other forum regulars.

BIOS Beep Codes

When a computer is first turned on, or rebooted, its BIOS performs a power-on self test (POST) to test the system's hardware, checking to make sure that all of the system's hardware components are working properly. Under normal circumstances, the POST will display an error message; however, if the BIOS detects an error before it can access the video card, or if there is a problem with the video card, it will produce a series of beeps, and the pattern of the beeps indicates what kind of problem the BIOS has detected.
Because there are many brands of BIOS, there are no standard beep codes for every BIOS.

The two most-used brands are AMI (American Megatrends International) and Phoenix.

Below are listed the beep codes for AMI systems, and here are the beep codes for Phoenix systems.


AMI Beep Codes

Beep Code Meaning
1 beep DRAM refresh failure. There is a problem in the system memory or the motherboard.
2 beeps Memory parity error. The parity circuit is not working properly.
3 beeps Base 64K RAM failure. There is a problem with the first 64K of system memory.
4 beeps System timer not operational. There is problem with the timer(s) that control functions on the motherboard.
5 beeps Processor failure. The system CPU has failed.
6 beeps Gate A20/keyboard controller failure. The keyboard IC controller has failed, preventing gate A20 from switching the processor to protect mode.
7 beeps Virtual mode exception error.
8 beeps Video memory error. The BIOS cannot write to the frame buffer memory on the video card.
9 beeps ROM checksum error. The BIOS ROM chip on the motherboard is likely faulty.
10 beeps CMOS checksum error. Something on the motherboard is causing an error when trying to interact with the CMOS.
11 beeps Bad cache memory. An error in the level 2 cache memory.
1 long beep, 2 short Failure in the video system.
1 long beep, 3 short A failure has been detected in memory above 64K.
1 long beep, 8 short Display test failure.
Continuous beeping A problem with the memory or video.
BIOS Beep Codes


Phoenix Beep Codes

Phoenix uses sequences of beeps to indicate problems. The "-" between each number below indicates a pause between each beep sequence. For example, 1-2-3 indicates one beep, followed by a pause and two beeps, followed by a pause and three beeps. Phoenix version before 4.x use 3-beep codes, while Phoenix versions starting with 4.x use 4-beep codes. Click here for AMI BIOS beep codes.
4-Beep Codes
Beep Code Meaning
1-1-1-3 Faulty CPU/motherboard. Verify real mode.
1-1-2-1 Faulty CPU/motherboard.
1-1-2-3 Faulty motherboard or one of its components.
1-1-3-1 Faulty motherboard or one of its components. Initialize chipset registers with initial POST values.
1-1-3-2 Faulty motherboard or one of its components.
1-1-3-3 Faulty motherboard or one of its components. Initialize CPU registers.
1-1-3-2
1-1-3-3
1-1-3-4 Failure in the first 64K of memory.
1-1-4-1 Level 2 cache error.
1-1-4-3 I/O port error.
1-2-1-1 Power management error.
1-2-1-2
1-2-1-3 Faulty motherboard or one of its components.
1-2-2-1 Keyboard controller failure.
1-2-2-3 BIOS ROM error.
1-2-3-1 System timer error.
1-2-3-3 DMA error.
1-2-4-1 IRQ controller error.
1-3-1-1 DRAM refresh error.
1-3-1-3 A20 gate failure.
1-3-2-1 Faulty motherboard or one of its components.
1-3-3-1 Extended memory error.
1-3-3-3
1-3-4-1
1-3-4-3 Error in first 1MB of system memory.
1-4-1-3
1-4-2-4 CPU error.
1-4-3-1
2-1-4-1 BIOS ROM shadow error.
1-4-3-2
1-4-3-3 Level 2 cache error.
1-4-4-1
1-4-4-2
2-1-1-1 Faulty motherboard or one of its components.
2-1-1-3
2-1-2-1 IRQ failure.
2-1-2-3 BIOS ROM error.
2-1-2-4
2-1-3-2 I/O port failure.
2-1-3-1
2-1-3-3 Video system failure.
2-1-1-3
2-1-2-1 IRQ failure.
2-1-2-3 BIOS ROM error.
2-1-2-4 I/O port failure.
2-1-4-3
2-2-1-1 Video card failure.
2-2-1-3
2-2-2-1
2-2-2-3 Keyboard controller failure.
2-2-3-1 IRQ error.
2-2-4-1 Error in first 1MB of system memory.
2-3-1-1
2-3-3-3 Extended memory failure.
2-3-2-1 Faulty motherboard or one of its components.
2-3-2-3
2-3-3-1 Level 2 cache error.
2-3-4-1
2-3-4-3 Motherboard or video card failure.
2-3-4-1
2-3-4-3
2-4-1-1 Motherboard or video card failure.
2-4-1-3 Faulty motherboard or one of its components.
2-4-2-1 RTC error.
2-4-2-3 Keyboard controller error.
2-4-4-1 IRQ error.
3-1-1-1
3-1-1-3
3-1-2-1
3-1-2-3 I/O port error.
3-1-3-1
3-1-3-3 Faulty motherboard or one of its components.
3-1-4-1
3-2-1-1
3-2-1-2 Floppy drive or hard drive failure.
3-2-1-3 Faulty motherboard or one of its components.
3-2-2-1 Keyboard controller error.
3-2-2-3
3-2-3-1
3-2-4-1 Faulty motherboard or one of its components.
3-2-4-3 IRQ error.
3-3-1-1 RTC error.
3-3-1-3 Key lock error.
3-3-3-3 Faulty motherboard or one of its components.
3-3-3-3
3-3-4-1
3-3-4-3
3-4-1-1
3-4-1-3
3-4-2-1
3-4-2-3
3-4-3-1
3-4-4-1
3-4-4-4 Faulty motherboard or one of its components.
4-1-1-1 Floppy drive or hard drive failure.
4-2-1-1
4-2-1-3
4-2-2-1 IRQ failure.
4-2-2-3
4-2-3-1
4-2-3-3
4-2-4-1 Faulty motherboard or one of its components.
4-2-4-3 Keyboard controller error.
4-3-1-3
4-3-1-4
4-3-2-1
4-3-2-2
4-3-3-1
4-3-4-1
4-3-4-3 Faulty motherboard or one of its components.
4-3-3-2
4-3-3-4 IRQ failure.
4-3-3-3
4-3-4-2 Floppy drive or hard drive failure.
3-Beep Codes
Beep Code Meaning
1-1-2 Faulty CPU/motherboard.
1-1-3 Faulty motherboard/CMOS read-write failure.
1-1-4 Faulty BIOS/BIOS ROM checksum error.
1-2-1 System timer not operational. There is a problem with the timer(s) that control functions on the motherboard.
1-2-2
1-2-3 Faulty motherboard/DMA failure.
1-3-1 Memory refresh failure.
1-3-2
1-3-3
1-3-4 Failure in the first 64K of memory.
1-4-1 Address line failure.
1-4-2 Parity RAM failure.
1-4-3 Timer failure.
1-4-4 NMI port failure.
2-_-_ Any combination of beeps after 2 indicates a failure in the first 64K of memory.
3-1-1 Master DMA failure.
3-1-2 Slave DMA failure.
3-1-3
3-1-4 Interrupt controller failure.
3-2-4 Keyboard controller failure.
3-3-1
3-3-2 CMOS error.
3-3-4 Video card failure.
3-4-1 Video card failure.
4-2-1 Timer failure.
4-2-2 CMOS shutdown failure.
4-2-3 Gate A20 failure.
4-2-4 Unexpected interrupt in protected mode.
4-3-1 RAM test failure.
4-3-3 Timer failure.
4-3-4 Time of day clock failure.
4-4-1 Serial port failure.
4-4-2 Parallel port failure.
4-4-3 Math coprocessor.

Configuring your Bulletproof FTP Server Tutorial

I am not sure where I found this tutorial, It’s been a while…It might even have been here... ..So if it is one of yours, my hat goes off to you once again....

After reading the excellent tutorial on "Creating an FTP" that Norway posted…

(I would suggest reading and following his tutorial first, then following up with this one)

I thought that perhaps this tutorial might be pretty helpful for those interested in knowing how to configure their Bulletproof FTP Server that don't already know how... Here's how to get started…

This is for the BulletProof FTP Server 2.10. However, It should work fine on most following versions as well.

I'm assuming you have it installed and cracked.

Basics
1. Start the program.
2. Click on Setup > Main > General from the pull-down menu.
3. Enter your server name into the 'Server Name' box. Under Connection set the “Max number of users" to any number. This is the limit as to how many users can be on your sever at any time.
4. Click on the 'options' tab of that same panel (on the side)
5. Look at the bottom, under IP Options. Put a check in the box “Refuse Multiple Connections from the same IP”. This will prevent one person from blocking your FTP to others.
6. Also put a check in the 'Blocked Banned IP (instead of notifying client). VERY IMPORTANT! If somebody decides to 'Hammer' (attempt to login numerous times VERY quickly) your server/computer may CRASH if you don't enable this.
7. Click on the 'advanced' tab
8. At the bottom again look at the 'hammering area'
9. Enable 'anti-hammer' and 'do not reply to people hammering' Set it for the following: Block IP 120 min if 5 connections in 60 sec. You can set this at whatever you want to but that is pretty much a standard Click 'OK'

Adding Users
11. Setup > User accounts form pull-down.
12. Right click in the empty 'User Accounts' area on the right: choose 'Add'
13. Enter account name. (ie: logon name)
14. In the 'Access rights' box right click: choose ‘Add’.
15. Browse until you find the directory (folder) you want to share. In the right column you will see a bunch of checkboxes. Put a check in the following ones: Read, Write, Append, Make, List, and +Subdirs. Press 'select'.
16. Enter a password for your new FTP account.
17. Click on 'Miscellaneous' in the left column. Make sure 'Enable Account' is selected. Enable 'Max Number of Users' set it at a number other than zero. 1 for a personal account and more that one for a group account. Enable 'Max. no. of connects per IP' set it at 1

18. Under 'Files' enable 'show relative path' this is a security issue. A FTP client will now not be able to see the ENTIRE path of the FTP. It will only see the path from the main directory. Hide hidden flies as well.
Put a tick in both of these.

Advanced:
You don't need to do any of this stuff, but It will help tweak your server and help you maintain order on it. All of the following will be broken down into small little areas that will tell you how to do one thing at a time.

Changing the Port
The default port is always 21, but you can change this. Many ISPs will routinely do a scan of its own users to find a ftp server, also when people scan for pubs they may scan your IP, thus finding your ftp server. If you do decide to change it many suggest that you make the port over 10,000.
1. Setup > Main > General
2. In the 'Connection' Area is a setting labeled 'Listen on Port Number:'
3. Make it any number you want. That will be your port number.
4. Click 'OK'

Making an 'Upload Only' or 'Download Only' ftp server.
This is for the entire SERVER, not just a user.
1. Setup > Main > Advanced
2. In the advanced window you will have the following options: uploads and downloads, downloads only, and uploads only. By default upload and download will be checked. Change it to whatever you want.
3. Click 'OK’


While you are running your server, usually you will end up spending more time at your computer than you normally do. Don't be afraid to ban IP's. Remember, on your FTP you do as you want.

When you are online you must also select the open server button next to the on-line button which is the on-line Button

You also have to use the actual Numbered ip Address ie: 66.250.216.67

Or even Better yet, get a no-ip.com address

How to Install Xampp on Ubuntu 12.04 +

Hi there linux fellas,
In this article I will show you how to install Xampp on Ubuntu 12.04 Precise Pangolin + (meaning this tutorial will work on any newer Ubuntu distros than 12.04). 
XAMPP is an easy to install multiplatform Apache distribution, working on Linux, Solaris, Windows and Mac OS X. It includes Apache web, MySQL, PHP, Perl, a FTP server and phpMyAdmin.
New in XAMPP 1.8.1:
  • New version of Apache (2.4.3)
  • New version of PHP (5.4.7)
  • New version of MySQL (5.5.27)
  • Nev version of phpMyAdmin (3.5.2.2)
Let’s start the installation guide:

How to install Xampp on Ubuntu 12.10 and Ubuntu 12.04:

Add the ppa:
$ sudo add-apt-repository ppa:upubuntu-com/xampp


Update the repo index:
$ sudo apt-get update


Install XAMPP:
$ sudo apt-get install xampp


How to install Xampp on Ubuntu 13.04:

Because there is no PPA for installing Xampp on Ubuntu 13.04, we have to make an installation from sources:
Download the sources: from sourceforge.
Create the /opt directory (if it does not exist) and extract the archive there:
$ cd ~/Downloads
$ sudo mkdir -p /opt


$ sudo tar xvfz xampp-linux-1.8.1.tar.gz -C /opt
This is it. Start the Lampp server now:
$ sudo /opt/lampp/lampp start


To access the XAMPP web interface, paste this link in your browser:http://localhost/xampp
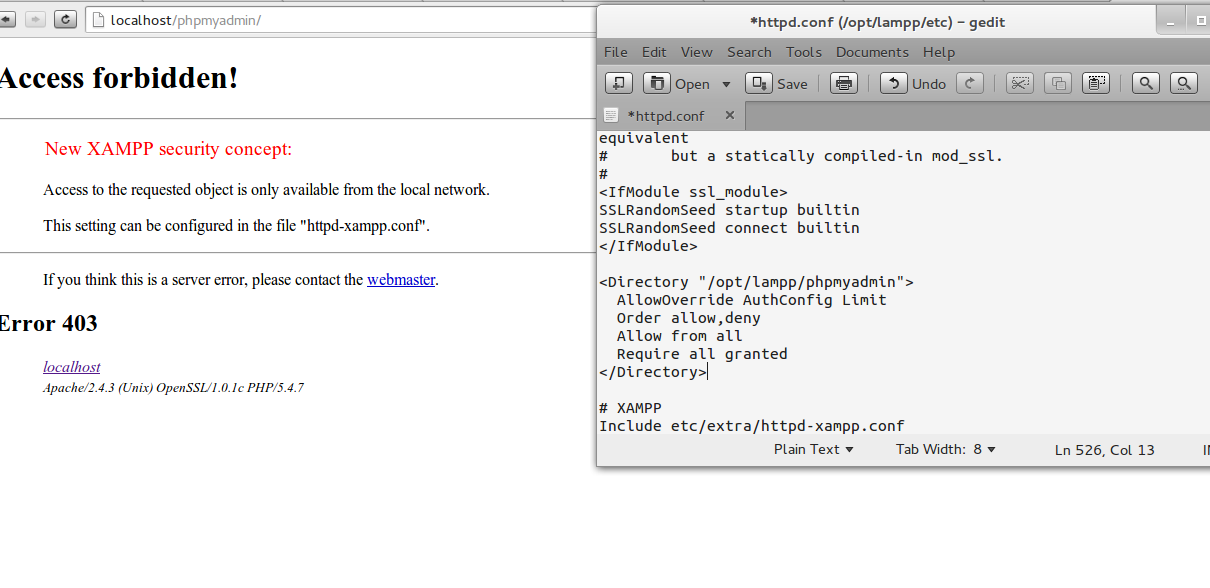
You may get this error when accessing XAMPP:
https://blogger.googleusercontent.com/img/b/R29vZ2xl/AVvXsEgc_QeLhUGblYMoh1kMIZQBYZJqK0c4H8fXhFaSg5x_E2UKw9Fph0BPMB82wVbW8Bo4rRouHvuev7V6FZiYPQ-hl2rUG2jnjfmiHLEc3S65SbYyVnllhRP0TCON0LwRbzGQJfiadh0UWMY/s1600/Screenshot+from+2013-05-07+15:52:52.png
Access forbidden!
New XAMPP security concept:
Access to the requested directory is only available from the local network.
This setting can be configured in the file “httpd-xampp.conf”.


To fix this, open the /opt/lampp/etc/extra/httpd-xampp.conf file with sudo priviledges:
$ gksudo gedit /opt/lampp/etc/extra/httpd-xampp.conf
And replace this code:
<Directory “/opt/lampp/phpmyadmin”>
AllowOverride AuthConfig Limit
Order allow,deny
Allow from all
</Directory>
With this one:
<Directory “/opt/lampp/phpmyadmin”>
AllowOverride AuthConfig Limit
Order allow,deny
Allow from all
Require all granted
</Directory>
Actually, all you have to do is add the Require all granted line, on the second last line of the block code.
For 64 bit systems only, install ia32-libs, to fix the “XAMPP is currently only availably as 32 bit application. Please use a 32 bit compatibility library for your system” error:
$ sudo apt-get install ia32-libs


Restart the lampp server and you are done:
$ sudo /opt/lampp/lampp restart